关于bash脚本的四种执行模式以及环境变量加载顺序的说明
1
2
3
4
5
6
7
8
9
10
11
12
13
14
15
|
/etc/profile(一定加载)
~/.bashrc(.bash_profile文件存在则加载)
~/.bash_profile(以下三个文件按顺序加载,一旦找到并加载其中一个便不再接着加载)
~/.bash_login
~/.profile
~/.bashrc
寻找环境变量BASH_ENV,将变量的值作为文件名进行查找,如果找到便加载它
|
小结:
通常如果需要远程执行某些开启或关闭进程的动作需要加载环境变量或其他操作时,可以在.bashrc文件中做加载或其他操作。如ssh远程执行的命令需要环境变量的支持,则就可以在远程主机对应用户的.bashrc做加载/etc/profile的动作。注意,不能在 ~/.bashrc 文件中有任何输出动作,否则可能将影响bash脚本的执行!
远程免密登录
测试机器:
1
2
| A: 172.16.127.128
B: 172.16.127.129
|
思路:
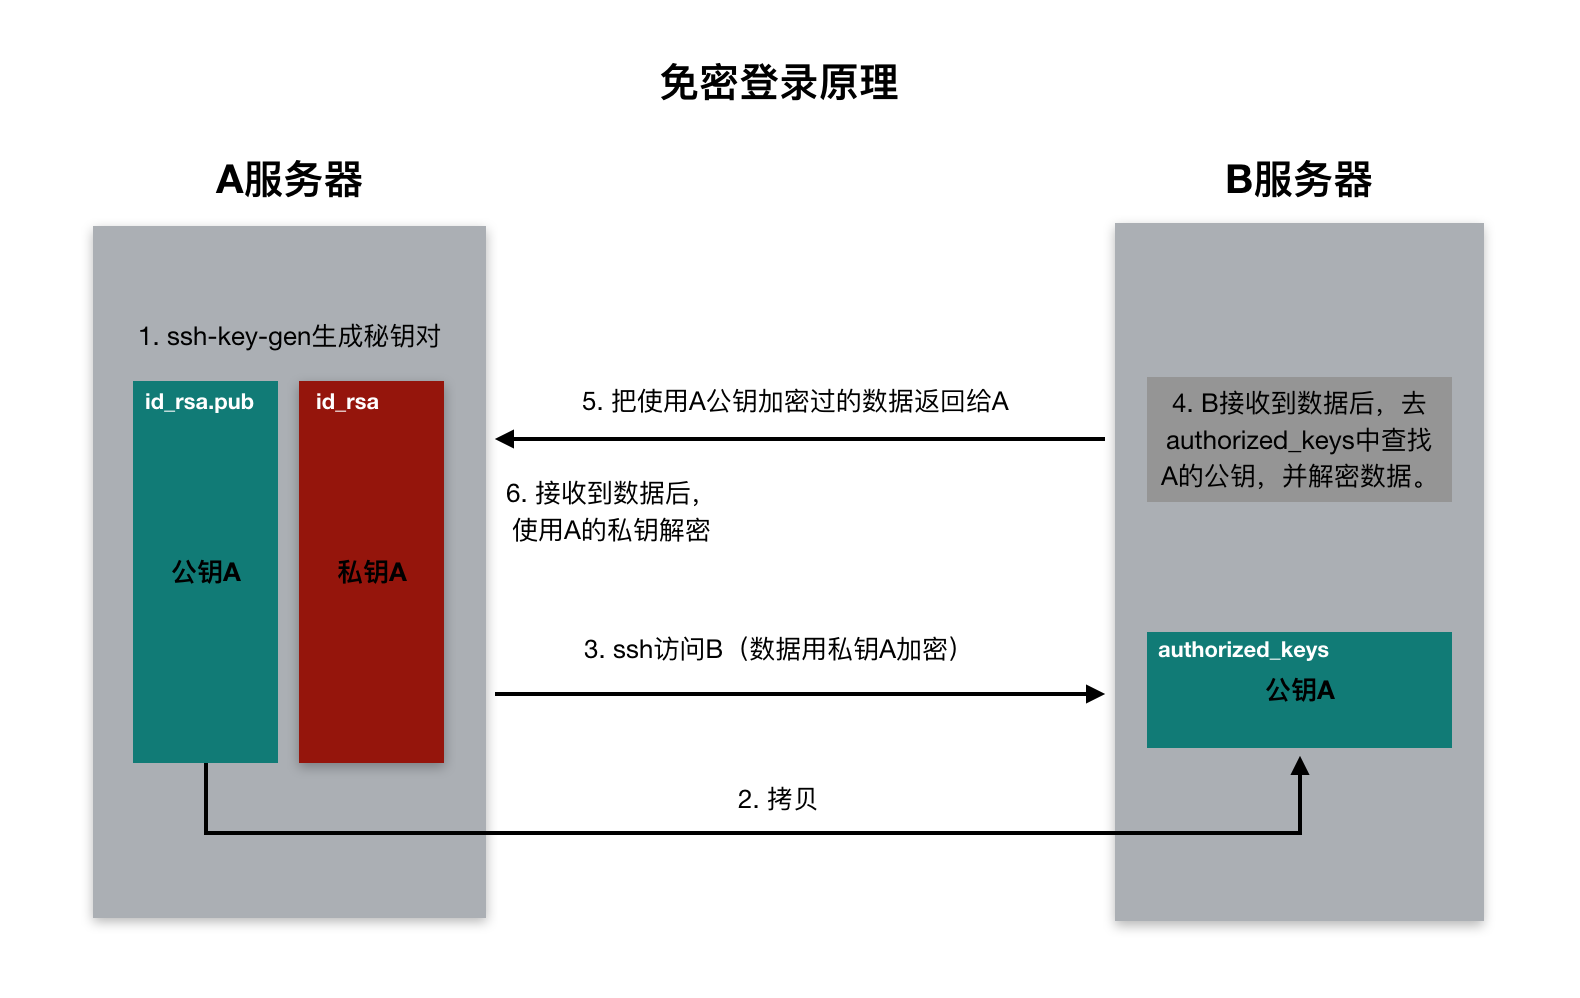
首先测试进行单向登录访问的设置,也就是A可以自由访问B 双向自由访问只是在A->B的基础上,在以同样的方式再设置B->A。

方法一
1) 在A机器上生成秘钥对
1
| $ ssh-keygen -t [rsa|dsa] -C "message…"
|
注意:公钥和私钥有且只能相互加密解密, 一般公钥加密|私钥解密, 私钥签章|公钥验章, 这样保证服务端和客户端能够相互认证对方合法性。私钥和公钥文件名称不要随意修改,否则设置不能生效!
2) 将A机器的公钥id_rsa.pub 复制到B机器的~/.ssh文件夹中, 并在B机器将id_rsa.pub的内容增加到~/.ssh/authorized_keys文件中。这里将A机器的id_rsa.pub 复制到B机器不是关键,关键是将A机器的公钥内容加入到B机器的authorized_keys文件中。
1
| $ cat id_rsa.pub >> ~/.ssh/authorized_keys
|
3) 设置文件夹和文件权限
1
2
| $ chmod 700 -R ~/.ssh
$ chmod 600 authorized_keys
|
上述三步设置完成, 就可以完成A->B了。
方法二
1) 在A机器上生成秘钥对
1
| $ ssh-keygen -t [rsa|dsa] -C “message…“
|
2) 在A上执行如下命令
1
| $ ssh-copy-id ubuntu@172.16.127.129
|
OK, 一切搞定,现在就可以A->B了。
这两步就相当于将A的公钥加到B的~/.ssh/authorized_pub文件中。
验证远程免密登录是否设置成功
1
2
3
4
5
6
7
8
9
|
$ ssh ubuntu@172.16.127.129
$ scp test.sh ubuntu@172.16.127.129:~/test
$ ssh -t -p $PORT $USER@$IP 'cmd'
$ ssh ubuntu@172.16.127.128 'chmod 764 ~/test/test.sh'
|
远程执行脚本zcall和远程分发脚本zcopy
脚本内容
1
2
3
4
5
6
7
8
9
10
11
12
13
| [root@host01 opt]
lrwxrwxrwx. 1 root root 18 Aug 20 23:13 zshells -> /opt/zshells-0.0.1
[root@host01 opt]
total 12
-rw-r--r--. 1 root root 21 Aug 21 12:57 hosts
-rwxr-xr-x. 1 root root 282 Aug 21 12:24 zcall
-rwxr-xr-x. 1 root root 378 Aug 21 12:56 zcopy
[root@host01 opt]
host01
host02
host03
|
远程执行脚本zcall:
1
2
3
4
5
6
7
8
9
10
11
12
13
14
15
16
17
18
19
| #!/bin/bash
hosts=/opt/zshells/hosts
user=`whoami`
param_count=$#
if (( param_count<1 )) ; then
echo no args
exit
fi
while read line
do
echo -------------$line---------------
ssh -n $user@$line $@
done < $hosts
|
远程分发脚本zcopy:
1
2
3
4
5
6
7
8
9
10
11
12
13
14
15
16
17
18
19
20
21
22
23
24
25
26
27
28
29
30
31
32
33
34
35
36
37
38
39
40
41
42
43
44
45
46
47
| #!/bin/bash
hosts=/opt/zshells/hosts
current_host=`hostname`
user=`whoami`
from=`pwd`
to=`pwd`
param_count=$#
if [[ $param_count == 0 ]] ; then
from=$from/*
elif [[ $param_count == 1 ]] ; then
bn1=`basename $1`
pn1=$(cd `dirname $1`;pwd)
if [ -d $1 ] ; then
from=$pn1/$bn1/*
to=$pn1/$bn1
elif [ -f $1 ] ; then
from=$pn1/$bn1
to=$pn1/
fi
elif [[ $param_count == 2 ]] ; then
bn1=`basename $1`
pn1=$(cd `dirname $1`;pwd)
bn2=`basename $2`
pn2=$(cd `dirname $2`;pwd)
if [ -d $1 ] ; then
from=$pn1/$bn1/*
to=$pn2/$bn2
elif [ -f $1 ] ; then
from=$pn1/$bn1
to=$pn2/
fi
fi
while read line
do
if [[ $line == $current_host ]] ; then
continue
fi
echo ------------$line-------------
ssh -n $user@$line mkdir -p $to
scp -r $from $user@$line:$to
done < $hosts
|
配置相关主机间的免密登录
(略)
环境变量的加载
全局环境变量 /etc/profile:
1
2
| export ZSHELLS_HOME=/opt/zshells
export PATH=$PATH:$ZSHELLS_HOME
|
用户的环境变量 ~/.bashrc:
1
2
3
4
5
6
7
8
9
10
11
12
13
14
15
|
alias rm='rm -i'
alias cp='cp -i'
alias mv='mv -i'
if [ -f /etc/bashrc ]; then
. /etc/bashrc
fi
if [ -f /etc/profile ]; then
. /etc/profile
fi
|
zcall和zcopy的使用示例
1
2
3
4
5
6
7
8
|
$ zcall jps
$ zcall `which jps`
$ zcall elasticsearch -d
$ zcall hadoop-daemon.sh start datanode
$ zcopy xxx/xx ~/xxx
|
