非阻塞式网络通信
传统阻塞式通信模型和NIO非阻塞通信模型间的区别
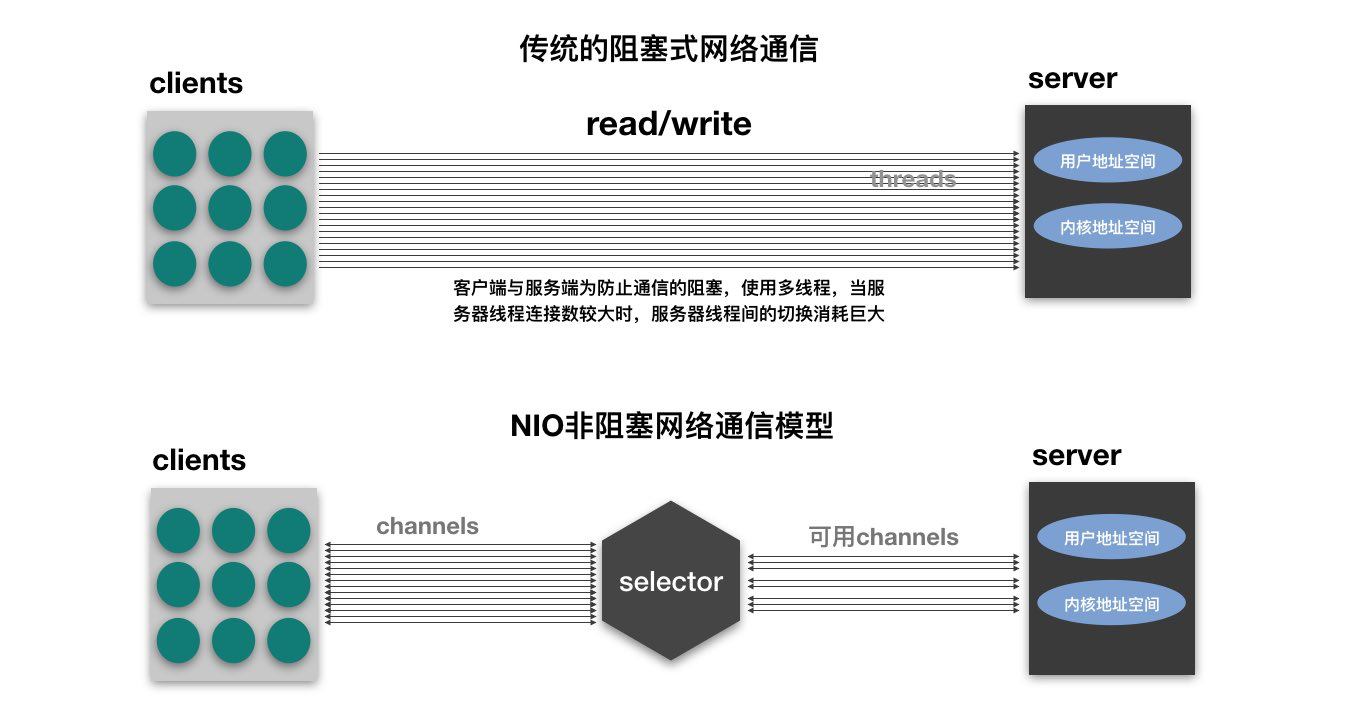
- 传统的 IO 流都是阻塞式的。也就是说,当一个线程调用 read() 或 write()时,该线程被阻塞,直到有一些数据被读取或写入,该线程在此期间不能执行其他任务。因此,在完成网络通信进行 IO 操作时,由于线程会阻塞,所以服务器端必须为每个客户端都提供一个独立的线程进行处理,当服务器端需要处理大量客户端时,性能急剧下降。
- Java NIO 是非阻塞模式的。当线程从某通道进行读写数据时,若没有数据可用时,该线程可以进行其他任务。线程通常将非阻塞 IO 的空闲时间用于在其他通道上执行 IO 操作,所以单独的线程可以管理多个输入和输出通道。因此,NIO 可以让服务器端使用一个或有限几个线程来同 时处理连接到服务器端的所有客户端。
选择器(selector)
Selector一般称为选择器,它实际上是SelectableChannel对象的多路复用器。它是Java NIO核心组件中的一个,用于检查一个或多个NIO Channel(通道)的状态是否处于可读、可写。如此可以实现单线程管理多个channels,也就是可以管理多个网络链接。
使用Selector的好处在于: 使用更少的线程来就可以来处理通道了, 相比使用多个线程,避免了线程上下文切换带来的开销。
SelectableChannel继承关系如下:
SelectableChannel
AbstractSelectableChannel
SocketChannelServerSocketChannelDatagramChannelPipe.SinkChannelPipe.SourceChannel
SelectionKey的使用:
- 当调用register(Selector s, int ops) 将通道注册到选择器时,选择器对通道的监听事件,需要通过第二个参数ops指定;
- SelectionKey表示SelectableChannel和Selector之间的注册关系,每次向选择器注册通道时就会选择一个事件(选择键),选择键包含两个表示为整数值的操作集,操作集的每一位表示该键的通道所支持的一类可选择操作,SelectionKey的主要方法如下:
- int interestsOpts() 获取感兴趣的事件集合
- int readyOpts() 获取通道已经准备就绪的操作的事件集合
- SelectableChannel channel() 获取注册通道
- Selector selector() 获取选择器
- isReadable()、isWritable()、isConnectable()、isAcceptable() 检测Channel中读、写、连接、接收是否就绪;
- 向Selector注册Channel时对应的可监听通道事件类型分别为 SelectionKey.OP_READ (1)、SelectionKey.OP_WRITE (4)、SelectionKey.OP_CONNECT (8)、SelectionKey.OP_ACCEPT (16),若监听的事件不止一个可以使用位或操作符 “|” 连接;
Selector的使用:
- Set keys() 获取所有SelectionKey集合,代表注册在该Selector上的Channel;
- Set selectedKeys() 获取该Selector上已被选择的SelectionKey集合;
- int select() 监听该Selector上所有注册的Channel,当它们中有需要处理的IO操作时,该方法返回,并将对应的SelectionKey加入到被选择的SelectionKey集合中,该方法返回这些Channel的数量;
- int select(long timeout) 可以设置操作时长的select操作;
- int selectNow() 执行一个立即返回的select操作,该方法不会阻塞线程;
- Selector wakeup() 使一个还未返回的select()方法立即返回;
- void() 关闭该选择器;
传统阻塞式通信和NIO非阻塞通信编程示例
阻塞式TCP通信示例:
1
2
3
4
5
6
7
8
9
10
11
12
13
14
15
16
17
18
19
20
21
22
23
24
25
26
27
28
29
30
31
32
33
34
35
36
37
38
39
40
41
42
43
44
45
46
47
48
49
50
51
52
53
54
55
56
57
58
59
60
61
62
63
64
|
@Test
public void test01() throws IOException {
SocketChannel sChannel =
SocketChannel.open(new InetSocketAddress("localhost", 8888));
FileChannel finChannel =
FileChannel.open(Paths.get("1.jpg"), StandardOpenOption.READ);
ByteBuffer buffer = ByteBuffer.allocate(1024);
while (finChannel.read(buffer) != -1) {
buffer.flip();
sChannel.write(buffer);
buffer.clear();
}
sChannel.shutdownOutput();
int len = 0;
Charset charset = Charset.forName("UTF-8");
while ((len=sChannel.read(buffer)) != -1) {
buffer.flip();
System.out.println(new String(buffer.array(), 0, len, charset));
buffer.clear();
}
finChannel.close();
sChannel.close();
}
@Test
public void test02() throws IOException {
ServerSocketChannel ssChannel =
ServerSocketChannel.open();
ssChannel.bind(new InetSocketAddress(8888));
FileChannel foutChannel =
FileChannel.open(Paths.get("2.jpg"),
StandardOpenOption.WRITE, StandardOpenOption.CREATE);
SocketChannel sChannel = ssChannel.accept();
ByteBuffer buffer = ByteBuffer.allocate(1024);
while (sChannel.read(buffer) != -1) {
buffer.flip();
foutChannel.write(buffer);
buffer.clear();
}
buffer.put("服务端接收成功!".getBytes(Charset.forName("UTF-8")));
buffer.flip();
sChannel.write(buffer);
foutChannel.close();
sChannel.close();
ssChannel.close();
}
|
非阻塞式TCP通信示例:
1
2
3
4
5
6
7
8
9
10
11
12
13
14
15
16
17
18
19
20
21
22
23
24
25
26
27
28
29
30
31
32
33
34
35
36
37
38
39
40
41
42
43
44
45
46
47
48
49
50
51
52
53
54
55
56
57
58
59
60
61
62
63
64
65
66
67
68
69
70
71
72
73
74
75
76
77
78
79
80
|
@Test
public void test01() throws IOException {
SocketChannel sChannel =
SocketChannel.open(new InetSocketAddress("localhost", 8888));
sChannel.configureBlocking(false);
ByteBuffer buffer = ByteBuffer.allocate(1024);
Scanner scanner = new Scanner(System.in);
while (scanner.hasNext()) {
String line = scanner.next();
buffer.put((new Date().toString() + ": " + line).getBytes());
buffer.flip();
sChannel.write(buffer);
buffer.clear();
}
scanner.close();
sChannel.close();
}
@Test
public void test02() throws IOException {
ServerSocketChannel ssChannel = ServerSocketChannel.open();
ssChannel.configureBlocking(false);
ssChannel.bind(new InetSocketAddress(8888));
Selector selector = Selector.open();
ssChannel.register(selector, SelectionKey.OP_ACCEPT);
while (selector.select() > 0) {
Iterator<SelectionKey> it = selector.selectedKeys().iterator();
while (it.hasNext()) {
SelectionKey sk = it.next();
if (!sk.isValid()) {
continue;
}
if (sk.isAcceptable()) {
SocketChannel sChannel = ssChannel.accept();
sChannel.configureBlocking(false);
sChannel.register(selector, SelectionKey.OP_READ);
} else if (sk.isReadable()) {
SocketChannel sChannel = (SocketChannel) sk.channel();
ByteBuffer buffer = ByteBuffer.allocate(1024);
int len = 0;
while ((len=sChannel.read(buffer)) > 0) {
buffer.flip();
System.out.println(new String(buffer.array(), 0, len));
buffer.clear();
}
} else if (sk.isWritable()) {
} else if (sk.isConnectable()) {
}
it.remove();
}
}
}
|
非阻塞式UDP通信示例:
1
2
3
4
5
6
7
8
9
10
11
12
13
14
15
16
17
18
19
20
21
22
23
24
25
26
27
28
29
30
31
32
33
34
35
36
37
38
39
40
41
42
43
44
45
46
47
48
49
50
51
52
53
| @Test
public void test01() throws IOException {
DatagramChannel dChannel = DatagramChannel.open();
dChannel.configureBlocking(false);
ByteBuffer buffer = ByteBuffer.allocate(1024);
Scanner scanner = new Scanner(System.in);
while (scanner.hasNext()) {
String line = scanner.next();
buffer.put(line.getBytes());
buffer.flip();
dChannel.send(buffer, new InetSocketAddress("localhost", 8888));
buffer.clear();
}
scanner.close();
dChannel.close();
}
@Test
public void test02() throws IOException {
DatagramChannel dChannel = DatagramChannel.open();
dChannel.configureBlocking(false);
dChannel.bind(new InetSocketAddress(8888));
Selector selector = Selector.open();
dChannel.register(selector, SelectionKey.OP_READ);
while (selector.select() > 0) {
Iterator<SelectionKey> it = selector.selectedKeys().iterator();
while (it.hasNext()) {
SelectionKey sk = it.next();
if (!sk.isValid()) {
continue;
}
if (sk.isAcceptable()) {
} else if (sk.isReadable()) {
ByteBuffer buffer = ByteBuffer.allocate(1024);
dChannel.receive(buffer);
buffer.flip();
System.out.println(new String(buffer.array(), 0, buffer.limit()));
buffer.clear();
} else if (sk.isWritable()) {
} else if (sk.isConnectable()) {
}
it.remove();
}
}
}
|
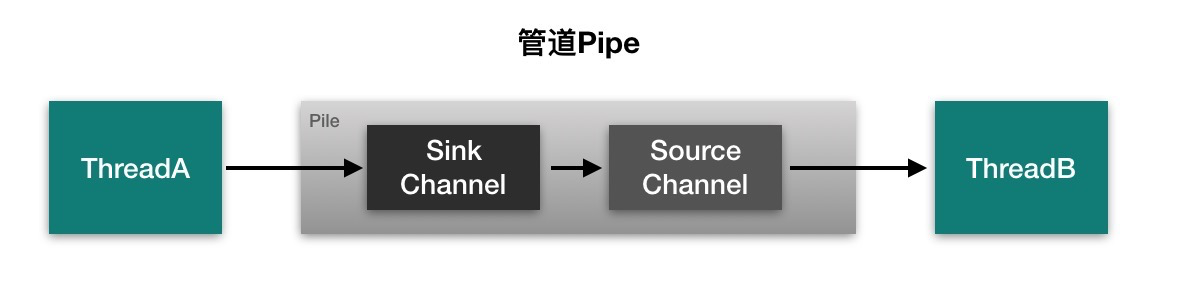
管道
Java NIO 管道是两个线程之间的单向数据连接。Pipe有一个Source通道和一个Sink通道。数据被写到Sink通道,从Source通道读取。
简单测试:
1
2
3
4
5
6
7
8
9
10
11
12
13
14
15
16
17
18
19
20
21
22
23
24
25
26
27
28
29
30
31
32
33
34
35
36
37
38
39
40
41
42
43
44
45
46
47
48
| public static void main(String[] args) throws Exception {
Pipe pipe = Pipe.open();
new Thread(new Runnable() {
@Override
public void run() {
SinkChannel sinkChannel = null;
try {
sinkChannel = pipe.sink();
ByteBuffer buffer = ByteBuffer.allocate(1024);
for(int i=0; i<10; i++) {
buffer.put((Thread.currentThread().getName()
+ "写入数据" + i).getBytes());
buffer.flip();
sinkChannel.write(buffer);
buffer.clear();
Thread.sleep(1000);
}
} catch (Exception e) {
e.printStackTrace();
} finally {
try { sinkChannel.close(); } catch (IOException e) {}
}
}
}).start();
new Thread(new Runnable() {
@Override
public void run() {
SourceChannel sourceChannel = null;
try {
sourceChannel = pipe.source();
ByteBuffer buffer = ByteBuffer.allocate(1024);
int len = 0;
while ((len=sourceChannel.read(buffer)) > 0) {
buffer.flip();
System.out.println(Thread.currentThread().getName()
+ ":" + new String(buffer.array(), 0, len));
buffer.clear();
}
} catch (Exception e) {
e.printStackTrace();
} finally {
try { sourceChannel.close(); } catch (IOException e) {}
}
}
}).start();
}
|
NIO.2-Path、Paths、Files
随着JDK7的发布,Java对NIO进行了极大的扩展,增强了对文件处理和文件系统特性的支持,以至于我们称他们为NIO.2。因为NIO提供的一些功能,NIO已经成为文件处理中越来越重要的部分。
Path与Paths
Paths提供的get()方法用来获取Path对象,Path get(String first, String … more) : 用于将多个字符串串连成路径。
Path常用方法:
- booleanendsWith(Stringpath): 判断是否以path路径结束
- booleanstartsWith(Stringpath): 判断是否以path路径开始
- boolean isAbsolute() : 判断是否是绝对路径
- PathgetFileName(): 返回与调用Path对象关联的文件名
- Path getName(int idx) : 返回的指定索引位置 idx 的路径名称
- intgetNameCount(): 返回Path根目录后面元素的数量
- PathgetParent(): 返回Path对象包含整个路径,不包含Path对象指定的文件路径
- PathgetRoot(): 返回调用Path对象的根路径
- Path resolve(Path p) : 将相对路径解析为绝对路径
- PathtoAbsolutePath(): 作为绝对路径返回调用Path对象
- StringtoString(): 返回调用Path对象的字符串表示形式
Files
java.nio.file.Files 用于操作文件或目录的工具类
常用方法:
- Path copy(Path src, Path dest, CopyOption … how) : 文件的复制
- Path createDirectory(Path path, FileAttribute<?> … attr) : 创建一个目录
- Path createFile(Path path, FileAttribute<?> … arr) : 创建一个文件
- void delete(Path path) : 删除一个文件
- Path move(Path src, Path dest, CopyOption…how) : 将 src 移动到 dest 位置
- long size(Path path) : 返回 path 指定文件的大小
Files常用方法-用于判断:
- boolean exists(Path path, LinkOption … opts) : 判断文件是否存在
- boolean isDirectory(Path path, LinkOption … opts) : 判断是否是目录
- boolean isExecutable(Path path) : 判断是否是可执行文件
- boolean isHidden(Path path) : 判断是否是隐藏文件
- boolean isReadable(Path path) : 判断文件是否可读
- boolean isWritable(Path path) : 判断文件是否可写
- boolean notExists(Path path, LinkOption … opts) : 判断文件是否不存在
- public static A readAttributes(Path path,Class type,LinkOption… options) : 获取与 path 指定的文件相关联的属性。
Files常用方法-用于操作内容:
- SeekableByteChannel newByteChannel(Path path, OpenOption…how) : 获取与指定文件的连接,
how 指定打开方式。
- DirectoryStream newDirectoryStream(Path path) : 打开 path 指定的目录
- InputStream newInputStream(Path path, OpenOption…how):获取 InputStream 对象
- OutputStream newOutputStream(Path path, OpenOption…how) : 获取 OutputStream 对象
自动资源管理
Java7增加了一个新特性,该特性提供了另外一种管理资源的方式,这种方式能自动关闭文 件。这个特性有时被称为自动资源管理 (Automatic Resource Management, ARM), 该特 性以 try 语句的扩展版为基础。自动资源管理主要用于,当不再需要文件(或其他资源)时,可以防止无意中忘记释放它们。
自动资源管理基于 try 语句的扩展形式:
1
2
3
4
5
6
7
8
9
| try(需要关闭的资源声明){
}catch(异常类型 变量名){
}
...
finally{
}
|
当 try 代码块结束时,自动释放资源。因此不需要显示的调用 close() 方法。该形式也称为“带资源的 try 语句”。
注意:
- try 语句中声明的资源被隐式声明为 final ,资源的作用局限于带资源的 try 语句
- 可以在一条 try 语句中管理多个资源,每个资源以“;” 隔开即可。
- 需要关闭的资源,必须实现了 AutoCloseable 接口或其自接口 Closeable